The second milestone build for EDT 0.8 is now available for download. Check out the new and noteworthy page to learn more about this milestone. In particular, we've added support for JNDI and IBM i.
To install EDT 0.8 Milestone 2, you'll need to add the Milestone Build site to your Available Software Sites list under the Help>Install New Software menu option. We suggest you call the site "EGL Development Tools milestones". The site URL is: http://download.eclipse.org/edt/milestones/1.0/
Once the milestone site has been added (which you may have done for Milestone 1), using Help>Check for Updates should find any new milestone builds. For more information about what's coming in the next milestone of EDT 0.8, see the EDT 0.8 Planning page.
As always, we welcome your feedback and questions on the EDT forum.
Two down, one to go!
Tuesday, February 28, 2012
Monday, February 20, 2012
Using the Rich UI editor
The Rich UI editor allows you to visually create a web application. Once you have created an EGL web 2.0 project, you can add a Rich UI handler to it. The Rich UI handler provides a default template that includes a GridLayout to help with placement of widgets on the page. In the Design view, you can drag and drop widgets from the Palette onto any cell of the GridLayout. Use the Properties tab to edit the widget, such as changing border, spacing, or alignment.
Decide you want to move a widget? Just drag and drop it to a new location. Need more space for widgets? Increase the number of rows and columns for the GridLayout using the Properties, or right-click within a GridLayout cell and select Insert to add a row or column above or below the current cell. (You can also Delete rows and columns via right-clicking on the GridLayout.)

One of our favorite features of the Rich UI editor is the ability to auto-generate a UI based on an EGL variable. You can drag-and-drop an EGL variable, such as a record type, from the EGL Data view to the Design view. The Insert Data wizard let's you select the fields to appear along with label, widget type and name.
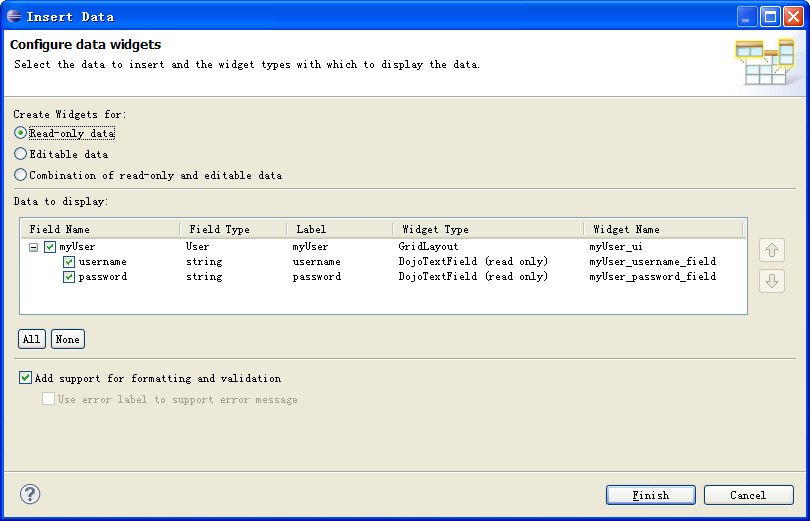
To help you get started using the Rich UI editor, members of our development team in China have developed a tutorial to Create a Rich UI logon page. This tutorial is a good way to familiarize yourself with the Rich UI editor for EGL. The tutorial covers using the Insert Data wizard as a quick way to create the UI from a record, as well as creating an event handler and testing the page using Preview.
Theresa
Decide you want to move a widget? Just drag and drop it to a new location. Need more space for widgets? Increase the number of rows and columns for the GridLayout using the Properties, or right-click within a GridLayout cell and select Insert to add a row or column above or below the current cell. (You can also Delete rows and columns via right-clicking on the GridLayout.)
One of our favorite features of the Rich UI editor is the ability to auto-generate a UI based on an EGL variable. You can drag-and-drop an EGL variable, such as a record type, from the EGL Data view to the Design view. The Insert Data wizard let's you select the fields to appear along with label, widget type and name.
To help you get started using the Rich UI editor, members of our development team in China have developed a tutorial to Create a Rich UI logon page. This tutorial is a good way to familiarize yourself with the Rich UI editor for EGL. The tutorial covers using the Insert Data wizard as a quick way to create the UI from a record, as well as creating an event handler and testing the page using Preview.
Theresa
Monday, February 6, 2012
Testing using EGL Unit (EUnit)
EGL Unit (EUnit) is a testing framework provided with EDT to develop test variations, generate driver programs, and validate the runtime results. You develop your tests once in EGL and execute them on all desired platforms using EDT generators, your extensions, and/or your own generators. The driver program is convenient to produce, simple to run, and the pretty results easy to analyze. Once you’ve built a set of test variations that validates the core logic of your application, the framework allows you to quickly assert the quality of your foundation.
For step-by-step instructions on how to write, generate, execute, and review test cases, see the EUnit wiki page. Here’s a sample EUnit test library to illustrate the simplicity and power of the framework. This statusTest library has five test variations and displays the possible test results.
For step-by-step instructions on how to write, generate, execute, and review test cases, see the EUnit wiki page. Here’s a sample EUnit test library to illustrate the simplicity and power of the framework. This statusTest library has five test variations and displays the possible test results.
package framework;
// basic EUnit test library for testcase status
library statusTests
function testStatusPassed(){@Test}
LogResult.assertTrue1(100 > 50 );
end
function testStatusPassed02(){@Test}
actual string = "restraint";
expect string = "restraint";
LogResult.assertStringEqual1(actual, expect);
end
function testStatusFailed(){@Test}
success boolean = 100 < 50;
LogResult.assertTrue("Testing fail condition", success );
end
function testStatusError(){@Test}
stuff int[] {1,2,3,4};
actual int = stuff[13];
LogResult.assertBigIntEqual1(3, actual);
end
function testStatusSkipped() {@Test}
LogResult.logStdOut("Some info about the defect");
LogResult.skipped("Bugzilla xxxx. Compile problem.");
End
end
A test variation needs to include the test annotation {@Test} and use one of the LogResults assert functions. Using content assist is a great away to check out the available assertion functions. To ensure your foundation, you want your test variations to be used frequently and interpreted by anyone. The skipped function denotes a variation that has a known issue and logStdOut allows for additional information to be included. For the prettiest view of the results, you will need Business Intelligence and Reporting Tools (BIRT). Here’s the Statistics Chart:

This chart provides a quick color-coded summary count of passing and non-passing test cases for all the test libraries exercised by the driver program. For more detailed information, you can open the individual report (.etr) for each library. Here’s the detailed report for the statusTest library:
Framework.statusTests
Reason: test case count: 5
passed: 2
failed: 1
error: 1
skipped: 1
first test case with error: statusTests::testStatusFailed
msg:
statusTests::testStatusPassed: OK
statusTests::testStatusPassed02: OK
statusTests::testStatusFailed: FAILED - Testing fail condition
statusTests::testStatusError: ERROR - uncaught exception for: statusTests::testStatusError
=> EGL0010E: List index 12 is out of bounds. The list's size is 4.
Some info about the defect
statusTests::testStatusSkipped: SKIPPED - Bugzilla xxxx. Compile problem.
The file provides a convenience link to the associated EGL library in case the test case needs to be reviewed or altered. The file contains the totals by status (passed, failed, etc.), indicates the first failing test case by identifying the function name. The msg section provides detailed information for each test variation. It is common for a developer to run the tests, save the result root, apply code changes, rerun the tests, and compare the results files to ensure the expected core behavior.
Utilizing the EUnit test framework will help you ensure the solid foundation of your application. You just need to evolve the test suite along side your application.
The EUnit framework can be used to automate your testing efforts. Please post any features you’d like to see in EUnit, as we hope to add more to this useful tool.
Kathy
Subscribe to:
Comments (Atom)